
Introduction
When I started this blog in 2017, I was working as a mechanical design engineer bored to tears by CAD and FEA. Don’t get me wrong—I actually enjoy SolidWorks, just not when it’s an integral component of my job description. But programming, for me, was infinitely more rewarding. Hence, my goals in creating a blog were 1) to learn or review topics in math/engineering and computer science, and 2) to create a modest-but-polished portfolio to aid my transition to a career in software.
I didn’t want to spend too much time setting up or maintaining a website but I did want to retain some control, so I opted for a WordPress blog self-hosted on SiteGround (as opposed to a WordPress hosted on WordPress.com). WordPress has a nice graphical interface for administrative tasks and writing posts. It also has an active community and loads of plugins. Need a contact form? There’s a plugin for that. Want code syntax highlighting? There’s a plugin for that. Looking for statistics on visitors to your site? There’s a… well, you get the idea.
My old, ugly WordPress site
It worked well enough for me for a couple years, but as I grew comfortable with software development and Linux, I found myself wanting to tinker. Unfortunately, WordPress is a hulking behemoth of PHP with so many moving parts and layers of abstraction as to be opaque to anyone who hasn’t spent a significant amount of time learning WordPress. Its codebase is convoluted, its style inconsistent, and it requires regular updates to patch its numerous vulnerabilities. Similarly, the WordPress plugin ecosystem is tenuous, with code quality and security varying wildly from plugin to plugin and author to author.
Furthermore, all site content is stored in a poorly structured MySQL database,
so a simple task like editing a post without the GUI involves the hassle
of reading from and writing to a database. There are command line tools
(e.g., wp-cli) that facilitate these tasks, but that’s still an unnecessary
barrier between me and my content.
Enter Hugo. Hugo is a fast, lightweight static site generator written in Go that enables more direct control over the site’s design and content. Posts are stored in plaintext markdown files. Because it generates a static site, it lacks the vulnerabilities of WordPress. It’s also incredibly simple to work on a local copy of the site and test changes locally before making those changes live on the web-facing version of the site.
As part of this redesign and migration, I ditched SiteGround as my host, where I was paying $15/month (their cheapest plan) in favor of a Digital Ocean Droplet that costs me $5/month. With SiteGround, you have limited control over the server. Essentially, you pay a premium for them to handle the administrative stuff and provide web-based tools to manage your site. On the other hand, with a Digital Ocean Droplet, you have complete control over the server and you’re responsible for all system administration. More work but much more flexibility, which, for someone who likes to get their hands dirty, is actually a win-win.
Steps
Choose a Hugo theme
I went with htr3n’s hyde-hyde theme for its clean look, relative simplicity, logical structure, and ease of customization.
Convert posts to markdown
Because WordPress stores posts in a MySQL database, the first step is extracting posts from the database and converting post metadata and content to markdown. Ideally, HTML in the post content should also be converted to Hugo-friendly markdown and shortcode. I used Cyrill Schumacher’s wordpress-to-hugo-exporter as a first pass.
This did a decent, albeit incomplete, job of generating Hugo-compatible markdown files from the WordPress database. In my case, it didn’t consistently format or indent code blocks correctly, nor did it generate Hugo image/figure shortcodes from <img> HTML tags, among other things. It also didn’t split long lines, whereas I prefer text files to have a maximum line length of 80 characters. To fix/format the markdown files to my liking, I wrote a hacky but functional Python script that leveraged pyparsing to define a context-free grammar, lex/parse the markdown files into tokens, fix incorrectly formatted tokens, and enforce an 80-character max line length (making exceptions for certain tokens, e.g., URLs or lines of code, even if they caused a line to exceed 80 characters).
Configure send-only email server
I wanted to receive post comment notifications and messages from the contact form in my GMail inbox, which I thought would be relatively straightforward, especially since I only wanted to send email from the server to one specific email address (mine) and didn’t need the server to receive email. Turns out email is a nightmare.
Initially, I tried to use sendmail but it worked inconsistently, so I ended
up using postfix, which can be installed and set up as follows:
sudo apt install postfix
sudo postfix start
To reconfigure postfix and change any settings, run
sudo dpkg-reconfigure postfix. Alternatively, you can directly edit
the settings in /etc/postfix/main.cf (don’t forget to sudo postfix reload
if you do). The mail server’s activity is logged to
/var/log/mail.log, which we can monitor via tail for debugging:
tail -f /var/log/mail.logAt this point, we can try to send a test email from the terminal to check if everything is working:
echo "test message body" | mail -s "test subject" foo.bar@gmail.comUnfortunately, some services are more strict than others. Case in point:
I was able to use the above command to send email to a Yahoo address but
attempting to send it to my GMail produced the following in
/var/log/mail.log:
Apr 28 17:14:53 localhost postfix/smtp[1686]: 71179717: to=<foo.bar@gmail.com>,
relay=gmail-smtp-in.l.google.com[173.194.206.26]:25, delay=0.52,
delays=0.03/0.02/0.16/0.31, dsn=5.7.26, status=bounced (host
gmail-smtp-in.l.google.com[173.194.206.26] said:
550-5.7.26 This message does not have authentication information or fails to
550-5.7.26 pass authentication checks. To best protect our users from spam, the
550-5.7.26 message has been blocked. Please visit 550-5.7.26
https://support.google.com/mail/answer/81126#authentication for more 550 5.7.26
information. 11si549071qvx.168 - gsmtp (in reply to end of DATA command))
I tried several solutions for this issue, like adding a domain SPF record in the Digital Ocean settings. Nothing worked. Ultimately, I opted for Amazon AWS SES (Simple Email Service) to send emails on behalf of my GMail account, which I like because it doesn’t involve using or storing my Google account credentials. AWS SES is free below a certain usage threshold, which, at present, more than covers my needs (and even above the threshold, it would be, at most, pennies a day).
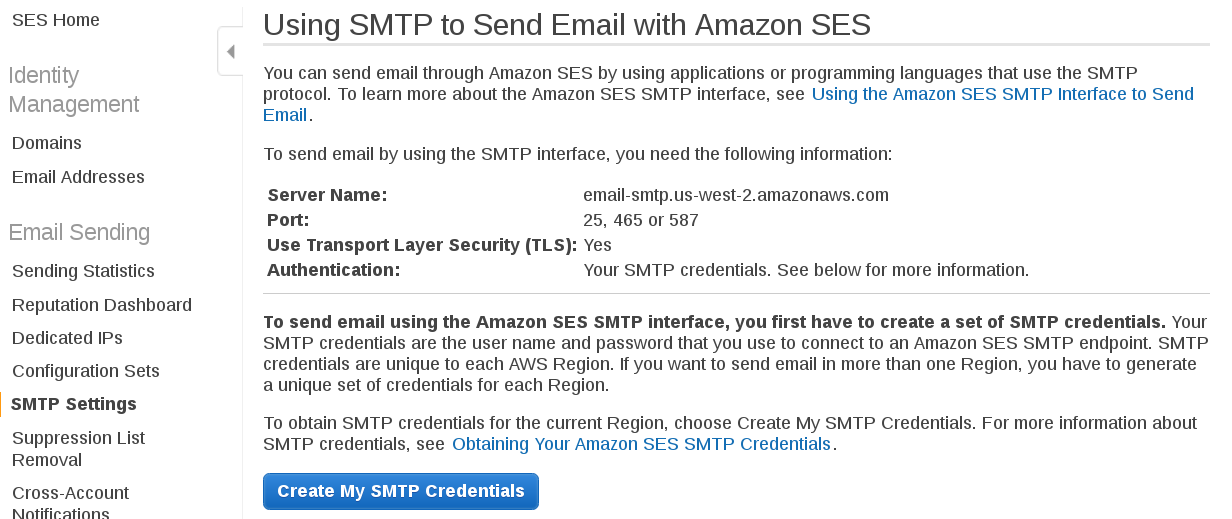
Make an AWS account first if you don’t have one, then navigate to AWS SES SMTP settings and make note of the server name and port choices.
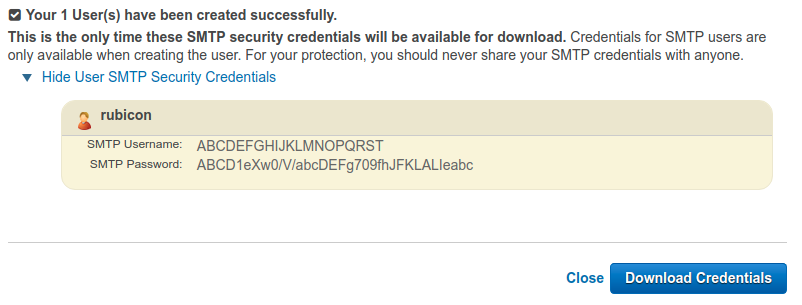
Click Create My SMTP Credentials and follow the instructions. At the end of the process, you’ll be presented with an SMTP username and password.
Finally, before you can use AWS SES credentials to send email, you’ll need to add and verify an email address in Email Addresses under the Identity Management category in the sidebar.
Add Isso post commenting system
In the interest of hosting things myself, I went with Isso because it’s open source, lightweight, and exists only on my server (unlike, e.g., Disqus). Isso is a comment server written in Python and JavaScript, and it uses a SQLite database on the backend to store comments. I installed Isso in a virtualenv per the official instructions:
virtualenv -p python3 /opt/isso
source /opt/isso/bin/activate
pip install isso
As a reference, I also found this post by Stiobhart Matulevicz helpful in integrating it into Hugo.
To add Isso comments to the hyde-hyde Hugo theme, I created a
Hugo partial for the comment section, which has some client-side
options for commenting, and included it at the end of the
single post content partial (refer to the Hugo documentation on
partial templates); I disabled reply email notifications because I
couldn’t get this feature to work, but may enable it in the future if I can
dig into Isso and identify the cause. I also added some modifications to the
comment section CSS. Finally, to customize the placeholder text in the
comment box to read Leave a comment instead of the default
Type Comment Here (at least 3 chars), I modified embed.min.js,
the minified JavaScript file that’s included with the Isso Python install. In
my case, that file is located at
/opt/isso/lib/python3.6/site-packages/isso/js/embed.min.js.
On the server side, Isso is configured with a configuration file, naturally.
This file can be named anything and can be placed anywhere. I named mine
isso.cfg and will refer to its filepath as /path/to/isso.cfg. My isso.cfg
looks something like this:
|
|
Full documentation of these server-side config parameters can be found
here, but make note of the server listen port on line 12 (1234
in this example); you can choose any unused port for this value. In the
[smtp] settings on line 20, the username and password should match
the AWS SES username/password credentials from earlier, host should match
the AWS SES server name, and port should be one of the port choices from
AWS SES. The to and from fields should contain an email address that you
added and verified on AWS SES.
For testing, Isso has a builtin server that can be started as follows:
source /opt/isso/bin/activate
isso -c /path/to/isso.cfg &
And stopped like so:
kill -SIGINT $(pgrep isso)If the server isn’t running, the comment section won’t appear in posts.
For actual deployment, we want something more robust, so I used gunicorn
and ran the server as a systemd service. To do this, I created a file at
/etc/systemd/system/isso.service and, using the Isso documentation’s
instructions for gunicorn deployment as a guideline, populated the file
as follows (note that gunicorn must first be installed in the Isso virtual
environment in /opt/isso):
[Unit]
Description=Isso comment server
After=network.target

[Service]
User=najam
Group=www-data
WorkingDirectory=/home/najam/isso
Environment="ISSO_SETTINGS=/path/to/isso.cfg"
ExecStart=/opt/isso/bin/gunicorn -b localhost:1234 -w 4 --preload isso.run
Restart=on-failure
RestartSec=5

[Install]
WantedBy=multi-user.target
being sure to replace 1234 with the server listen port defined in isso.cfg.
The service can be enabled and started as follows:
systemctl enable isso
systemctl start isso
Next, we need to let the Isso server communicate with Apache by using Apache as a reverse proxy. Enable the proxy modules:
a2enmod proxy
a2enmod proxy_http
Then, per the instructions in this post by danuker (and
referring to this Digital Ocean tutorial for additional information),
we add the following lines to the site’s Apache configuration file VirtualHost
settings, which should be found in /etc/apache2/sites-available/:
  ProxyPass /isso/ http://localhost:1234/
  ProxyPassReverse /isso/ http://localhost:1234/
This binds the /isso/ web endpoint to the port we defined in isso.cfg.
These lines should be added to the site’s SSL VirtualHost entry as well,
for HTTPS.
Transfer WordPress comments to Isso database
WordPress has a feature to export the contents of the site, including comments,
as an XML file. I wrote my own tools to extract comments from this XML output
and import them into the Isso SQLite database. xmlread.py uses the
builtin Python xml module to parse the XML structure and write out a JSON
file linking posts to their corresponding comments. Next, I used
import_comments.py to read that JSON file and insert the comments into
the Isso SQLite database file.
After that last step, I found that code blocks in some comments didn’t display
correctly because WordPress renders them differently than Isso. To fix these
formatting issues, I manually edited those comments. Since comments in the
aforementioned JSON file were written out as single-line strings (with newlines
represented by the \n newline character), it would have been a pain to edit
them as-is, so I created another script, editable_comments.py, that
contains a function to write each comment out to a human-friendly, easily
editable text file. After editing them, a different function in the script
takes a pointer to the directory of text files and puts them back into the
original JSON format, on which we can again run import_comments.py to insert
them into the database.
Create a contact form
Major credit goes to Fredrik Jonsson and his post on creating an HTML/PHP/JavaScript contact form with spam protection from scratch, as well as his Hugo Zen theme that served as a guideline on integrating it into Hugo. On the frontend, his implementation utilizes jQuery. I wrote my own implementation in pure JavaScript to avoid adding a dependency. To prevent the contact page from automatically reloading upon form submission, I disabled the default submit behavior and wrote the AJAX POST request logic myself with the aid of this obscure repo, which shows an example of such a contact form. Here’s the relevant function from my script:
|
|
On the backend, Fredrik’s implementation uses a PHP script to validate the
contact form input and send it via the default PHP mail() function.
However, this function is limited and doesn’t support authentication, which
we need for AWS SES. Therefore, I rewrote the script to utilize the PHP
PEAR framework and its Mail.php header, as demonstrated in this
LFC Hosting article. PEAR can be installed as follows:
sudo apt install php-pear
sudo apt install php-mail
Initially, when I tested the contact form with my PHP script, I encountered
the following PHP warning in the Apache error log (whose location is defined
in your site’s .conf file in /etc/apache2/sites-available; in my case, it’s
/var/log/apache2/error.log):
PHP Warning:  require_once(): open_basedir restriction in effect.
File(/usr/share/php/Mail.php) is not within the allowed path(s):
To fix this, I had to comment out the open_basedir entry in my Apache
php.ini file. There are several php.ini files, but you can figure out which
one Apache is using via phpinfo (on my system, it’s
/etc/php/7.2/apache2/php.ini).
Add KaTeX math typesetting
An engineering blog isn’t complete without math typesetting. I opted for KaTeX over MathJax, which I was using previously. KaTeX is faster and more lightweight than MathJax, even if it’s not quite as full-featured. This involved creating a partial for KaTeX to pull in the necessary JavaScript and CSS, then appending the following shortcode to the default page HTML template:
{{ if .Params.katex }}{{ partial "katex.html" . }}{{ end }}This way, any post with katex: true in its markdown file header will include
the necessary KaTeX functionality.
Generate and deploy static site files
To generate the site files, we simply have to run the hugo command in the
source directory, which places the files in a new directory named public,
then copy those files to the appropriate Apache server directory:
export HTML_DIR=/var/www/nrsyed.com/public_html

hugo && touch public
sudo rm -r $HTML_DIR/*
sudo cp -r public/* $HTML_DIR
I run touch on the newly created directory because Hugo doesn’t correctly
set the directory’s Last Modified date to a valid value. In my case, it set
it to August 30, 1754—though, to be fair, I haven’t looked at the Hugo
source code to understand how it works under the hood. It’s entirely possible
the build involves time travel (which would explain why it’s so fast).
This isn’t a problem in and of itself; however, I use a version of ranger file manager that crashes when it encounters an invalid date. Apparently, this issue has been addressed in newer versions that have not yet found their way into the Ubuntu repositories.
One advantage of using a static site generator is that the source files can be version controlled and stored in a git repo on GitHub. I took a few precautions to avoid inadvertently pushing authentication credentials and to avoid putting that information in the site’s web root directory. Instead, this information is contained in a “secrets” text file outside the web root and outside the git repo. The contact form PHP script, which shouldn’t be directly accessible from the web anyway, reads the values from that file via the following logic:
|
|
The base-64 encoding of secret values doesn’t really make them more secure,
but it does obscure their meaning in the event the server is compromised. To
avoid accidentally pushing credentials and personal information to GitHub, I
created a file named isso.cfg.nosecrets, which is an isso.cfg with a
few dummy values. I wrote a simple Python script called sitetools.py that
takes paths to the secrets file and the “dummy” Isso config file, replaces the
dummy values with the actual values, and writes the result to isso.cfg
(which is in the repo’s .gitignore). The script also updates the
$secrets_file path variable in the PHP script in the build files.
Admittedly, most of this is unnecessary, but a little healthy paranoia never hurt, right?
Conclusion
After a great deal of pain and effort and a great many nights spent hovering over a backlit keyboard, I’ve ended up with what I would describe as a Frankenstein’s monster of solutions, some amalgamated from various corners of the internet and others from various corners of my mind. Was it worth it? I’d say so. Not only is the new site more modern-looking and aesthetically pleasing on the frontend and more efficient and secure on the backend, but I also feel a sense of ownership over it and all its components.
I am not a web developer or a sysadmin (if I were, this transition probably would have taken one-tenth the time it did, and it probably wouldn’t have felt like a sufficient ordeal accomplishment to warrant its own blog post), but I’ve certainly gained some appreciation for those skillsets and expanded my own technical toolkit in the process.