
- Introduction
- Prerequisites
- Install OpenCV from the Arch repositories
- Install OpenCV by building from source
- Check the installation (C++)
- Link the OpenCV Python bindings
Introduction
If you’re looking to install OpenCV on Arch, you have two options. The first is to just use the pre-compiled package available in the official Arch repositories.
The other option is to compile OpenCV from source, which gives you more control over what gets installed. For starters, if you install from the Arch repositories, you’re locked in to the version of OpenCV for which the package was compiled, which, at the time of this writing, is 3.4.3—the current stable release. The 4.0.0 pre-release is not yet available through the repositories. This probably won’t be an issue for most people, but could be if you need features only available in the pre-release.
Furthermore, the pre-built package seems like it contains all available modules,
including extra modules from the opencv_contrib Github repository.
Again, this isn’t a problem in and of itself, but may be if you
don’t want the extra modules or are working on a system with limited
storage space.
Additionally, if you plan to use OpenCV-Python, the Python hooks in the pre-built package have been compiled against Python 2.7 and Python 3.7. Once again, most likely not an issue, but if you’re using a different version of Python on your machine, it may present problems. The pre-built package has also been compiled against a specific version of numpy—likely the latest at the time of its release—and if you’re using a different version of numpy, there may also be compatibility issues.
Lastly, the title mentions installing on a copy of Arch that’s running in a VM. While I did perform my install in a VM, the instructions are applicable for any installation of OpenCV on Arch, whether in a VM or not. There are a couple VM-specific pieces of information that have clearly been marked as such; you can ignore these if they’re not applicable to you.
With that out of the way, let’s dive in.
Prerequisites
You’ll want to make sure you’ve installed base-devel
(which is simply a group of development-related packages), cmake,
and ffmpeg (or libav video codecs). You may also want to make sure
you have image codec libraries, like libjpeg-turbo and libtiff.
You can find a more thorough list of dependencies in the
OpenCV documentation.
If you plan to work with Python, you should obviously have Python installed, as
well as python-pip. Generally, with Python, you’ll want to
work in a virtual environment, so be sure you’ve also installed
virtualenv through pip.
$ sudo pip install virtualenvGenerally, you should not install Python packages with sudo!
Doing so installs them globally rather than within an
isolated, controlled virtual environment. The only Python packages you should
install globally should be those related to setting up and managing virtual
environments. Personally, I like to supplement virtualenv with
virtualenvwrapper:
$ sudo pip install virtualenv virtualenvwrapperLike the examples shown in the
virtualenvwrapper installation documentation, I use
~/.virtualenvs as the directory for my virtual environments, but you can
use any directory you’d like.
For the remainder of this post, I’ll use a Python virtual environment
named cv but, again, you can name it anything. To create a new
virtual environment with virtualenvwrapper, issue the following command:
$ mkvirtualenv cvEnsure the virtual environment is activated, then install numpy.
$ workon cv
$ pip install numpy
Install OpenCV from the Arch repositories
The easiest way to install OpenCV on Arch is to simply use the pre-built package from the official repositories.
$ sudo pacman -S opencvOptionally, you can also install the OpenCV samples:
$ sudo pacman -S opencv opencv-samplesInstall OpenCV by building from source
First, make sure git is installed.
$ sudo pacman -S --needed gitClone the main opencv repository and, if desired, the
opencv_contrib repository, which contains extra modules, from Github. For
simplicity, the instructions that follow will put these repositories in your
home directory, but the location doesn’t matter.
$ cd ~
$ git clone https://github.com/opencv/opencv.git
$ git clone https://github.come/opencv/opencv_contrib.git
The rest of the instructions for this step borrow from Adrian Rosebrock’s latest post on installing OpenCV for Ubuntu 18.04.
Within the cloned opencv repository, make a directory named
build and cd into that directory.
$ cd ~/opencv
$ mkdir build
$ cd build
Next, ensure that your Python virtual environment is active, then run
cmake with the following parameters:
$ cmake -D CMAKE_BUILD_TYPE=RELEASE \
  -D CMAKE_INSTALL_PREFIX=/usr/local \
  -D INSTALL_PYTHON_EXAMPLES=OFF \
  -D INSTALL_C_EXAMPLES=OFF \
  -D OPENCV_EXTRA_MODULES_PATH=~/opencv_contrib/modules \
  -D PYTHON_EXECUTABLE=~/.virtualenvs/cv/bin/python \
  -D BUILD_EXAMPLES=ON \
  -D ENABLE_PRECOMPILED_HEADERS=ON ..
You can choose whether to compile or not compile any of the
examples—they’re not necessary for the installation itself. If
you’ve chosen not to install the opencv_contrib modules,
omit that line above. To obtain the correct path to your Python executable, make
sure you’re in the correct virtual environment, then use the
which command:
$ which python
/home/najam/.virtualenvs/cv/bin/python
After you’ve run this cmake command, examine the output,
particularly the Python-related portions near the end. It should look something
like this:
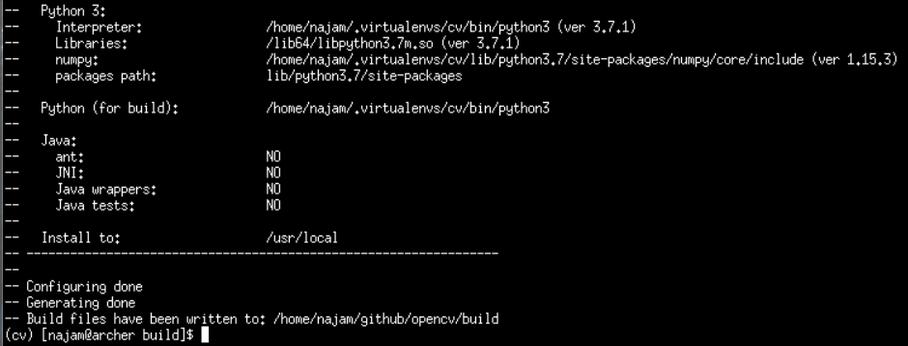
In particular, make sure that the lines for the Python interpreter and
numpy point to the correct locations—they should correspond to the
path for your virtual environment. If they’re not correct, remove all
files from the build folder:
$ rm -R ~/opencv/build/*Be sure you’ve activated the correct virtual environment and that the
cmake flags are correct. Examine the rest of the
cmake output as well to make sure nothing else important is missing.
Then, run the aforementioned cmake command again.
Once cmake is happy (and you’re satisfied with its output),
it’s time to actually build the necessary files. In the
build directory, simply run make. To speed up the build
process, take advantage of all the cores your processor has with the
-j flag.
$ make -j4In this example, -j4 instructs make to run up to
four jobs in parallel (assuming your processor has at least four CPUs). Run
lscpu to find out how many CPUs are available on your system:
$ lscpu | grep -i '^cpu(s)'
CPU(s):        4
Virtual machine–specific details
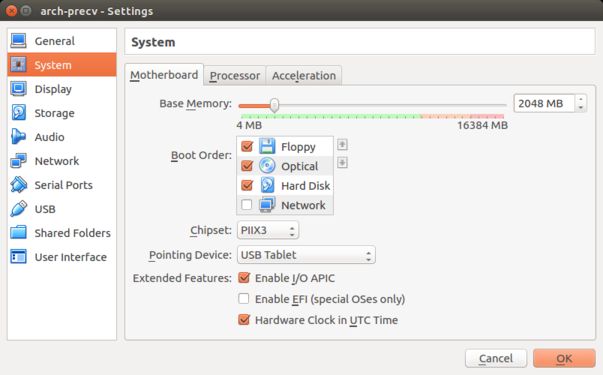
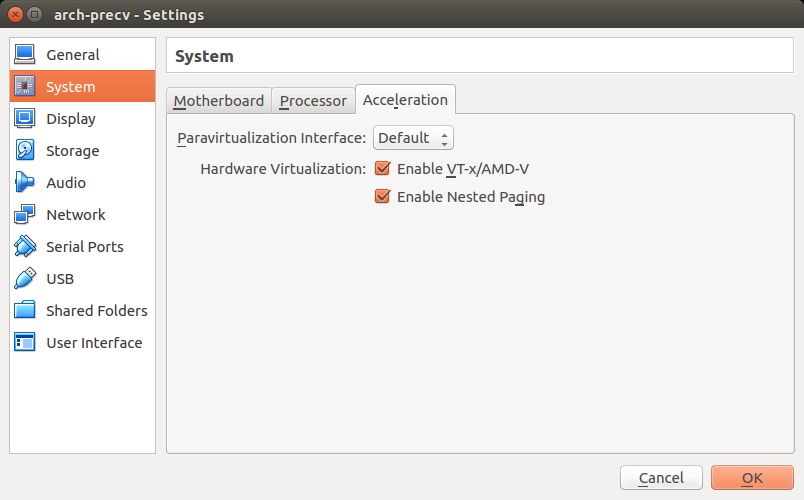
If, like me, you’re working with a copy of Arch in a virtual machine, you may have to make a couple adjustments. The instructions and screenshots below are for VirtualBox, since that’s what I’m using.
To permit the VM to utilize your CPU’s cores for the build process (i.e.,
for make’s -j flag), make the following
changes in the VM’s System settings:
-
On the Motherboard tab, check “Enable I/O APIC” under Extended Features.
-
On the Acceleration tab, make sure that “Enable VT-x/AMD-V” is selected under Hardware Virtualization.
-
On the Processor tab, increase the number of CPUs to the desired number.

In the VM itself, check that the number of CPUs reflects your chosen settings by
running lscpu as mentioned previously.
Potential error: can't write PCH file
In my case, the partition on which I was installing OpenCV apparently wasn’t large enough to fit some of the header files created during the build process (which can be several GB larger than the library itself). Specifically, I received the following error:
fatal error: can't write PCH file: No space left on device
compilation terminated
(Note that the output of my make command in the screenshot above
is more verbose than normal because I ran it with the -d (debug) flag).
“PCH” refers to “precompiled headers.” To address this
error, I had to re-run cmake with -DENABLE_PRECOMPILED_HEADERS=OFF. If you
have to do this, remove all the files originally generated by cmake first.
Potential issue: make hangs at XX%
This seems to be a relatively common problem, according to a Google search, in
which make reaches [28%] or [37%] or [99%] or [100%] or some other
percentage and hangs there indefinitely. Some individuals report having to wait
up to 20 or 30 minutes at [99%] or [100%], so try being patient, first. However,
if that doesn’t help, there may be a few potential solutions.
In my case, I hadn’t given my VM instance enough RAM. I found that increasing the amount of memory from 1GB to 2GB in the instance System settings Motherboard tab (“Base Memory”) did the trick.
Other solutions include compiling with a single CPU via make -j1
or increasing the amount of swap space. You can also run make with
the -d option to print all debug information, which might help you
zero in on the issue if the aforementioned solutions don’t work.
Hopefully, at this point, you’ve been able to get OpenCV to compile successfully. The next step is to perform the actual install and update the linker with the following commands:
$ sudo make install
$ sudo ldconfig
Check the installation (C++)
After completing the installation per the previous steps, fire up a text editor
and write the following short C++ program (I’ll call it cv.cpp):
#include <iostream>
#include <opencv2/core.hpp>

int main() {
  std::cout << "OpenCV version: " << CV_VERSION << std::endl;
  return 0;
}
Then compile and run the program as follows.
$ g++ cv.cpp -o cv
$ ./cv
OpenCV version: 4.0.0-pre
Potential error: No such file or directory
When I first tried to compile the program above, I received the following error:
fatal error: opencv2/core.hpp: No such file or directory
#include <opencv2/core.hpp>
compilation terminated
To troubleshoot the issue, I ran find from the root directory:
$ cd /
$ sudo find . -name '*core.hpp'
Ignoring the results from my home directory (which were simply from the build,
not the install), I saw that the header files had been installed to
/usr/local/include/opencv4/opencv2/ instead of /usr/local/include/opencv2/:

I’ve used the procedure in this post to build and install OpenCV (including the 4.0.0 pre-release) from source in the past and haven’t encountered this issue before. Thus, I have no idea whether it’s due to some peculiarity with my system and setup—with Arch or with VirtualBox—or whether I overlooked something during the build process. If you can shed some light on this phenomenon, please leave a comment or send me a message. Regardless, I was able to solve it by creating a symlink as follows:
$ sudo ln -s /usr/local/include/opencv4/opencv2/ /usr/local/include/opencv2After doing this, I had no problems compiling the program.
Link the OpenCV Python bindings
Lastly, if you’re planning to use OpenCV-Python, you need to create a symlink
between the OpenCV Python shared library and your Python virtual environment.
The file you need to link to should be located in
/usr/local/lib/python3.7/site-packages (replace python3.7
with the version against which you built OpenCV) and will be named something
like cv2.cpython-37m-x86_64-linux-gnu.so. If you can’t find it
there, run a search with the find command:
$ cd /
$ sudo find . -name 'cv2*.so'
You’ll want to create a symlink to that file in the site-packages
directory of your virtual environment. In my case, that would be
~/.virtualenvs/cv/lib/python3.7/site-packages. Replace this path
with the path corresponding to your virtual environment, and name the symlink
cv2.so, as in the following example.
$ ln -s /usr/local/lib/python3.7/site-packages/cv2.cpython-37m-x86_64-linux-gnu.so ~/.virtualenvs/cv/lib/python3.7/site-packages/cv2.soNow, test it out. Make sure you’re in your Python virtual environment, enter the Python shell, and run a couple commands:
$ workon cv
$ python
Python 3.7.1 (default, Oct 22 2018, 10:41:28)
[GCC 8.2.1 20180831] on linux
Type "help", "copyright", "credits" or "license" for more information.
>>> import cv2
>>> cv2.__version__
'4.0.0-pre'
>>>
Congratulations! If you’ve gotten this far, everything should finally be working. Plus, if you’ve gone the route of building from source, it makes you feel like you’ve really accomplished something, which, I think, is its own reward.